Laptop users commonly use headphones for multiple purposes, so even a tiny problem with headphone jacks can be worrisome. However, headphone jacks sometimes start acting up, which leads to many problems when your laptop headphone jack not working. This is not something to be worried about anymore since here are some easy ways to fix the headphone jack not working on a laptop.
6 Ways To Fix Your Laptop Headphone Jack Not Working
#1 Make sure your headphone is plugged in properly
Sometimes, the problem is so minor that you just plug your headphones into the wrong jack. If this is the case, simply unplug the headphones and plug them into the correct jack to fix the problem. Typically, headphone jacks are color-coded green or have the headphone logo on the jack. You can easily identify the correct headphone jack and insert your headphones correctly to enjoy listening.
#2 Make sure the headphone is enabled
Sometimes, you need to select a default device for your laptop if it has a built-in speaker and is connected to an external speaker. In this case, you need to select one of them, because both speakers will not work at the same time. Here is how you can do this:
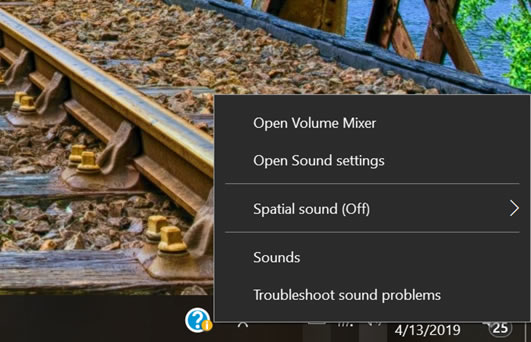
1. Go to your taskbar and right-click once on the sound icon. From there, select the sounds tab when a new list appears.
2. Go to the Playback tab, right-click your headphone device icon, and select the enable option.
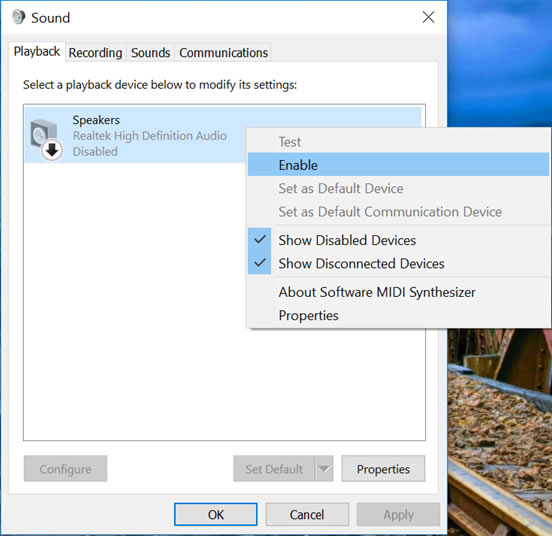
This should solve your problem, particularly if you are using Windows 10. But if you are still facing the problem of the headphone jack not working on your laptop, then please follow the next step.
#3 Make sure the volume is audible
There can be times when you are a little distracted and forget to unmute the headphones or have the volume too low to be audible. To resolve this, you need to:
1. Click on the sound icon on the far right of the lower side of your laptop screen. Then, unmute the headphones by clicking on the speaker icon.
2. If the headset is not already muted, move the volume slider to the right to turn up the volume.
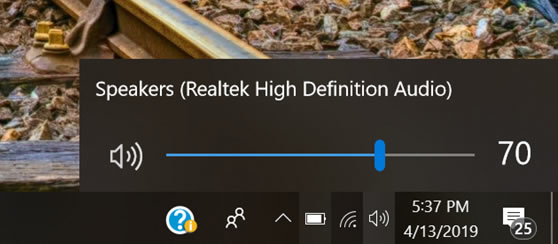
This will make the volume audible, and you can start listening to the sounds via your headphones.
#4 Make sure your headphone is working
If you have done all the above things and still see the laptop headphone jack not working, then maybe the problem lies in your headphones. This is something that you can easily take care of.
1. Try plugging another pair of headphones into your laptop to see if it works. If it works, it’s a problem with the previous headphones.
2. If the other pair of headphones is also not working, then it is not a problem with the headphones.
#5 Update your audio driver
Outdated or inappropriate audio drivers can cause issues with the laptop headphone jack not working. In that case, you do not have to go through the complexities of manually selecting and updating your laptop’s audio driver.
Please click “search“> type Device Manager>Sound, video, and game controllers, then right-click on your audio driver and select update driver. This will help you troubleshoot the problem, and hopefully, your headphones will start working.

#6 Replace laptop audio board
A laptop’s audio board can be faulty, too, and if all the above methods do not work for you, then this is most likely the problem at hand. Most laptops have an audio board referred to as the Daughter board, which is separate from the motherboard. You can replace the audio board to solve the problem once and for all. You can find an audio board for your laptop in our laptop parts store.
Also Read: How to Fix Laptop Speakers not working
These methods can help you fix the laptop headphone jack not working issue. So, now you can fix your laptop and start enjoying your favorite audio once again!


Thank you for your article, it helps me a lot.